For the uninitiated, here’s a quick recap on the previous parts of this series:
- Part 1 - loading the data and EDA
For this week’s post we’ll be focussing on two things - using the H&M image data to create image embeddings and finding similar items and setting up Neo4j Fabric as a bit of an exploration into how it works.
The reason I’m looking at these two subjects together is that say we scale up a recommendations database and we have billions of transactions with an ever increasing range of products, we may need to shard the data across several instances. In terms of this dataset, I’ll look to keep the customer and transactional data in one database and then keep the product and image data in a separate database. Neo4j Fabric will then give us the capability to run queries across both of these instances at the same time.
Setting Up Neo4j Fabric
Most of the setup was based on this post for modifying the config files followed by a fairly simple cypher script which created a separate database to store the products and eventually each products image embedding.
First the following lines were added to the Neo4j config file:
#Fabric config
fabric.database.name=fabric

fabric.graph.0.uri=neo4j://localhost:7687
fabric.graph.0.database=neo4j
fabric.graph.0.name=neo4j

fabric.graph.1.uri=neo4j://localhost:7687
fabric.graph.1.database=products
fabric.graph.1.name=products
And then the product nodes were uploaded to the product database as follows.
//Fabric Setup - https://neo4j.com/blog/getting-started-with-neo4j-fabric/

:use system;

create database products;

use products:

CREATE CONSTRAINT uniqueProduct IF NOT EXISTS FOR (n:Product) REQUIRE (n.code) IS UNIQUE;

LOAD CSV WITH HEADERS FROM 'file:///articles.csv' AS row
MERGE (prod:Product {code: row.article_id})
And that’s the the Fabric setup done, now onto creating some image embeddings.
Image Embeddings
The H&M dataset contains images for almost all of the products. Consequently, one way of creating recommendations is based on looking at products which are visually the most similar. Before I go on, it’s worth noting that recommendations isn’t strictly a similarity search; if someone has just purchased a pair of jeans, then recommending some jeans that look exactly the same may or may not be a good recommendation. It may be a case that we need to find items that complement the original purchase in which case we’ll look at collaborative filtering approaches in later blog posts. However, for now we’ll start by looking at item to item similarity through image embeddings.
The first part of this task was to create some image embeddings that could be used to create a comparison between images. With help from this repo, we can create a small class that uses a pre-trained ResNet 50 V2 model to create a 2048 dimensional embedding for each image. Here’s the code:
from tensorflow.keras.models import Model
from tensorflow.keras.applications import resnet_v2
from tensorflow import keras
from tensorflow.keras import layers
from tensorflow.keras.preprocessing import image
import numpy as np


class ImageEmbedder():

    def __init__(self):

        self._IMAGE_TARGET_SIZE = (224,224)

        # Create an instance of a pretrained resnet model
        # include_top to include the 2048x1 embedding layer
        pre_trained_model = resnet_v2.ResNet50V2(
            input_shape = (224, 224, 3),
            weights = 'imagenet',
            include_top=True
        )

        # Create a model that outputs only the second to last layer
        self.embedding_model = Model(
            inputs=pre_trained_model.input,
            outputs=pre_trained_model.get_layer('avg_pool').output
        )

    def create_embedding(self, image_path):
        img = image.load_img(
            image_path,
            target_size=self._IMAGE_TARGET_SIZE
        )

        # Convert the image to an array
        img_vec = image.img_to_array(img)
        # The model expects batches of images in the shape
        # (n,224,224,3), so add an extra dimension
        img_vec = np.expand_dims(img_vec, axis=0)

        # resnet_v2 has a built in function to preprocess
        # images for the resnet model
        img_vec = resnet_v2.preprocess_input(img_vec)

        # Return the embedding from the function
        return self.embedding_model.predict(img_vec)
Now we have a way to create the image embeddings, we need to way to efficiently upload them to the Neo4j database. Similarly to above, we can create another class to take care of this. Luckily the Neo4j Python Docs have some good resources for the best ways of doing this.
import logging
import sys
from neo4j import GraphDatabase
from neo4j.exceptions import ServiceUnavailable

class NeoProdEmbeddings:

    def __init__(self, uri, user, password):
        self.driver = GraphDatabase.driver(uri, auth=(user, password))

    def close(self):
        # Don't forget to close the driver connection when you are finished with it
        self.driver.close()

    @staticmethod
    def enable_log(level, output_stream):
        handler = logging.StreamHandler(output_stream)
        handler.setLevel(level)
        logging.getLogger("neo4j").addHandler(handler)
        logging.getLogger("neo4j").setLevel(level)

    def add_prod_embedding(self, prod_id, embedding):
        with self.driver.session(database='products') as session:
            # Write transactions allow the driver to handle retries and transient errors
            result = session.write_transaction(
                self._add_and_return_embedding, prod_id, embedding)
            for row in result:
                print(f"Created embedding for product ID {prod_id}")

    @staticmethod
    def _add_and_return_embedding(tx, prod_id, embedding):
        query = (
            "MERGE (prod:Product { code: $prod_id }) "
            "ON MATCH set prod.embedding = $embedding "
            "RETURN prod.code as prod_code, prod.embedding[0] as embedding_0"
        )
        result = tx.run(query, prod_id=prod_id,
                        embedding=embedding)
        try:
            return [
                {
                    "prod_code": row["prod_code"],
                    "embedding_0": row["embedding_0"]
                }
                    for row in result
            ]
        # Capture any errors along with the query and data for traceability
        except ServiceUnavailable as exception:
            logging.error(f"{query} raised an error: \n {exception}")
            raise
The code above should be relatively self explanatory. All it’s doing is taking an product ID code and uploading a vector to each product.
Bringing It All Together
Now we have a couple different classes to take care of the tasks, we just need a small python script to run things.
from embed_functions import image_embedder, neo_helper
from pathlib import Path

if __name__=='__main__':

    uri = "bolt://localhost:7687"
    user = 'neo4j'
    password = 'password'

    # Instatiate each of the classes we made
    img_emb = image_embedder.ImageEmbedder()
    neo_emb = neo_helper.NeoProdEmbeddings(uri, user, password)

    IMAGE_DIR = '/Users/grantbeasley/Downloads/images/'
    images = Path(IMAGE_DIR)

    # Find all of the image files
    all_files = [image for folder in images.iterdir() if not folder.name == '.DS_Store' for image in folder.iterdir() if image.suffix == '.jpg']

    # Iterate through each image an upload to the database
    for file in all_files:
        prod_id = file.name.replace('.jpg', '')
        print(prod_id)
        embedding = img_emb.create_embedding(file)
        neo_emb.add_prod_embedding(prod_id, embedding[0].tolist())
And the above script was left to run to create an embedding for each image and upload it to the database.
As a quick aside, I did a quick test to see if there was any real performance difference in a list comprehension and a for loop when creating the all_files list and here are the results:
%%timeit

all_files = []
for folder in images.iterdir():
    if not folder.name == '.DS_Store':
        for image in folder.iterdir():
            if image.suffix == '.jpg':
                all_files.append(image)
>>> 1 loop, best of 3: 254 ms per loop

%%timeit
all_files = [image for folder in images.iterdir() if not folder.name == '.DS_Store' for image in folder.iterdir() if image.suffix == '.jpg']

>>> 1 loop, best of 3: 247 ms per loop
Potentially the for loop is a bit more ‘pythonic’ but the performance is almost identical. Anyway, moving on…
Tidying Things Up
When moving on to looking at image similarity using the Neo4j GDS Library, I came across a Neo4j NullPointer error when trying to create a graph projection. It turned out it was the images that didn’t have an image were causing the issue so I had to add some zero vectors in for these images.
uri = "bolt://localhost:7687"
driver = GraphDatabase.driver(uri, auth=("neo4j", "password"))

# Create a 2048 length vector of zeros
zero_vec = np.zeros(2048).tolist()

with driver.session(database='products') as session:
    results = list(
        session.run(
            """MATCH (p:Product) WHERE p.embedding IS NULL
               SET p.embedding = $zero_vec RETURN id(p)""",
            zero_vec=zero_vec
        )
    )
Comparing the images
So now we have all the products loaded into the database, each with a 2048 dimensional embedding of the product image. Now we can use the Neo4j KNN alogrithm to find the 10 most similar items for each item in our database. the KNN algorithm defaults to cosine similarity when the node properties are vectors which suits our embeddings perfectly. As usual, we will create the graph projection, run the algorithm on the projection and write the similarity relationships back to the graph.
// GDS Queries
// Use appropriate database
:use products;

// Create graph projection with node properties
CALL gds.graph.create(
    'knnGraph',
    {
        Product: {
            label: 'Product',
            properties:'embedding'
        }
    },
    '*'
);

// Create the top 10 nearest neighbours based on the image embeddings
CALL gds.beta.knn.write('knnGraph', {
    writeRelationshipType: 'SIMILAR',
    writeProperty: 'score',
    topK: 10,
    randomSeed: 42,
    concurrency: 1,
    nodeWeightProperty: 'embedding'
})
YIELD nodesCompared, relationshipsWritten;
Visualising the Recommendations
Using the similarities we have just created, we can now go through a visual exploration of the top recommendations for a random sample of products. Firstly, we can create a random sample of 20 products.
# Load 20 random products from the database
with driver.session(database = 'products') as session:
    result = session.run(
        """MATCH (p:Product)
        RETURN p.code as prod_code
        ORDER BY rand() LIMIT 20"""
    )
    prod_sample = [record["prod_code"] for record in result]
We can also create a few helper functions to plot the items and recommendations.
def plot_item(code, image_files):
    """
    Takes the product_code and a list of all the image
    files and plots the product image_embedder
    """

    # Lets assume there's only one file for each prod_code
    file = [file for file in image_files if code in file.name]
    if len(file) == 0:
        print(f'No image for {code}')
    else:
        img = image.imread(file[0])
        plt.imshow(img)

def return_similar_items_fabric(code, driver):
    """
    Queries the Neo4j fabric database and returns the
    10 most similar items for a given item
    """

    with driver.session(database='fabric') as session:
        results = session.run(
            """
                CALL {
                    USE fabric.products
                    MATCH (p:Product {code: $prod_code})-[s:SIMILAR]->(p2:Product)
                    RETURN p2.code as prod_code, s.score as sim_score
                    }
                CALL{
                    USE fabric.neo4j
                    WITH prod_code
                    MATCH (d:Department)<-[:FROM_DEPARTMENT]-(p:Product {code:prod_code})-[:SUBSET_OF]->(type:ProductType)
                    RETURN type.name as prod_type, d.name as department_name
                    }

                RETURN prod_code, sim_score, prod_type, department_name
            """,
            prod_code = code
        )

        sim_items = [(record["prod_code"], record["sim_score"], record["prod_type"], record["department_name"]) for record in results]

    return sim_items

def plot_similar_items_fabric(code, sim_items, image_files):
    """
    Given a product and a list of similar items,
    plots all the similar items for comaprison
    """

    fig, axes = plt.subplots(figsize=(20,12), nrows=2, ncols=5)

    for i,ax in zip(sim_items, axes.flatten()):
        file = [file for file in image_files if i[0] in file.name]
        if len(file) == 0:
            continue
        else:
            img = image.imread(file[0])
            ax.imshow(img)
            ax.set_title(f'{i[1]:.2f} - {i[2]}\n{i[3]}')
Before we move onto the actual images, it’s worth looking at how we query the Neo4j Fabric database. We use the CALL function to query each of the parts of the database separately and specify which part inside the functions such use use fabric.products. From here, we can pass parts of the result from one part of the query to the next part of the query and use them to create queries across the different databases as if they were one instance.
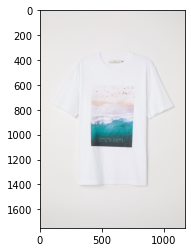
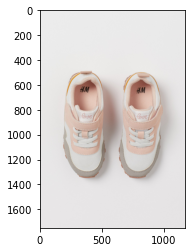
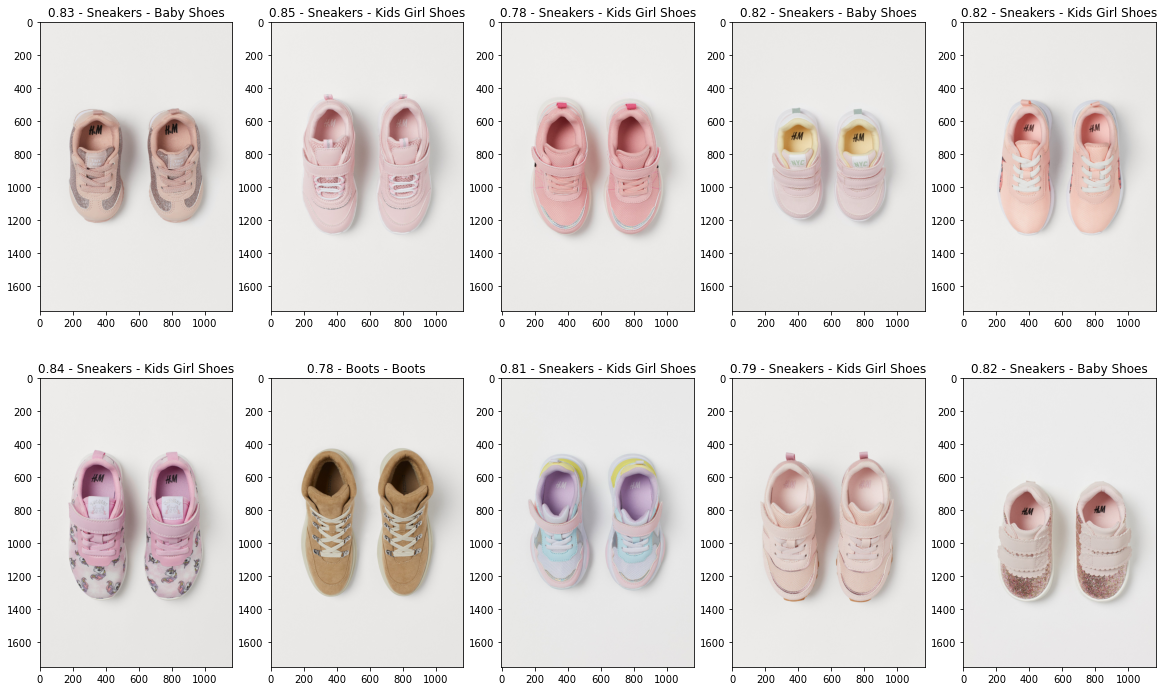
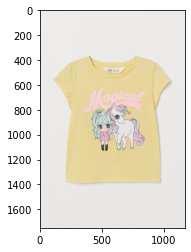
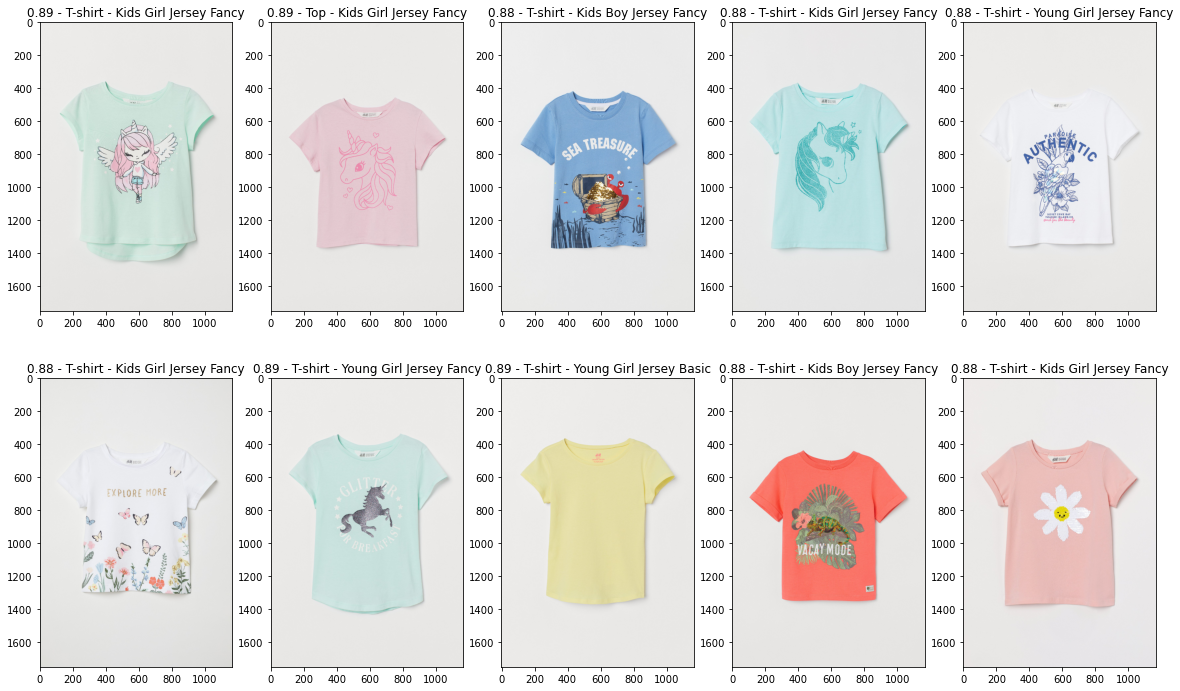
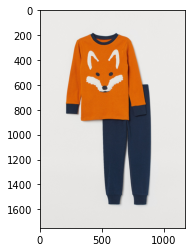
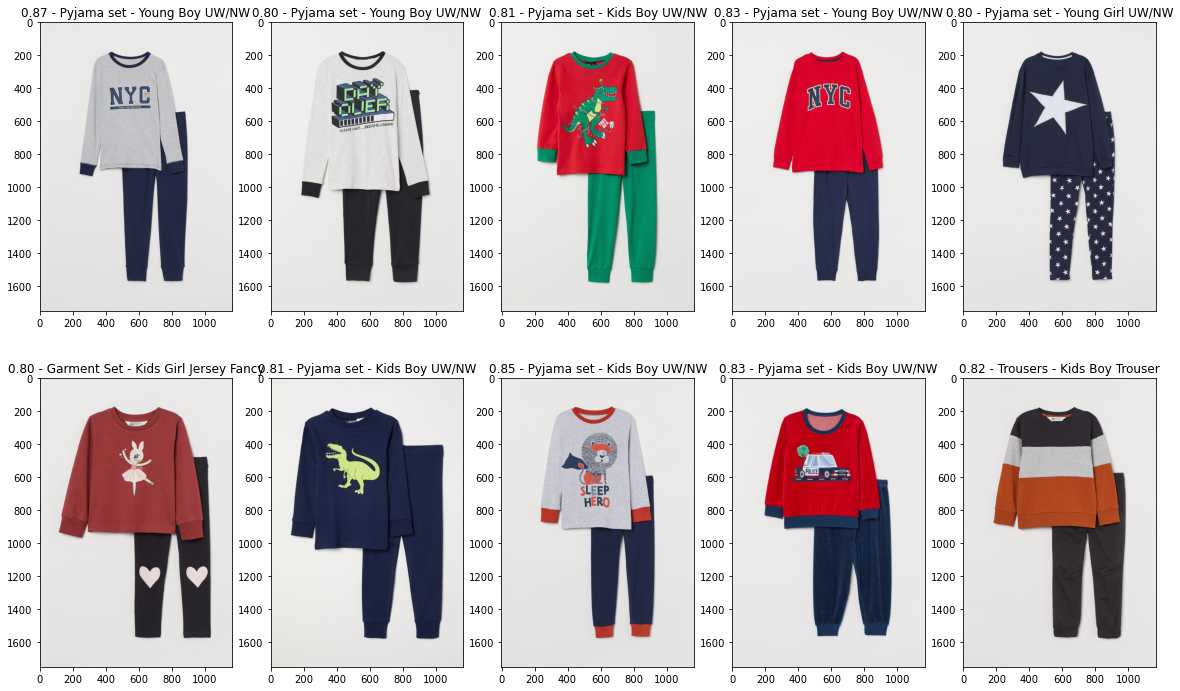
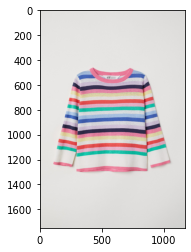
And finally, the part we’ve all been waiting for, let’s have a look at some of the recommendations. Things to note as we look at the images:
- The embeddings appear to be good at discriminating overall colour and hue
- They also seem to pick up large images and prints on the products and also the location of the prints
- Patterns such as hoops and stripes are also grouped similarly
- Not all similar images would be good recommendations however as we often get images that are similar but from different departments e.g. a boys tops as the most similar item to a girls top. This is where we can integrate Neo4j queries and the image embeddings to creating better recommendations and we’ll get onto this next in the coming weeks.